
Brand Indicators for Message Identification (BIMI)
"A picture is worth a thousand words."


Put trust back into email, and build your brand with BIMI.
WHY BIMI?
01
BRAND VISIBILITY
BIMI lets you put your brand logo in email inboxes. The average consumer does not know how to verify whether the email claiming to be from your brand was genuinely sent by you.
BIMI puts you in control. Showcase your logo right as a brand avatar when you genuinely send emails from your domains.
02
BRAND TRUST
Put trust back into email. Boost the trust users and partners have in emails originating from you.
A picture is worth a thousand words. Your logo alongside your genuine emails enables your users to trust communications sent from you. Ensure no one can send email from you, except you.
BIMI puts trust back into email: Visually!
03
USER EXPERIENCE
Enhance user experience when engaging with your emails. Knowing that the email originating from your domains is genuinely users just at a visual glance, enhances user experience. Particularly if emails from you are critical and crucial - whether it is e-commerce, financial, health, telecom, transactional or pertains to crucial information - your users deserve the rich experience BIMI affords you and them.

MEET BIMI


WHAT IS BIMI?
BIMI is an industry standard that relies on DMARC on the backend. DMARC ensures your emails are authentic and genuine. Once this trust is available on a domain, BIMI becomes the visible layer of that confidence in email as a channel of communication. DMARC was the remit of security teams, but BIMI brings that to the business layer - and is a marketers best friend in an environment where there is email overload - BIMI makes your emails stand out.
WHY DO BIMI?
BIMI is a marketers best friend, and a security teams visual manifestation of the hard work they have done in securing the email against impersonation and phishing attacks. Brand forgery can finally be protected on email as a channel. Gain brand trust, Put your logo front, right and centre in the users; mailbox, and more importantly enhance user experience with BIMI. It is new but extremely powerful, and now adopted by industry leaders, as a mark of trust.
TECHNOLOGY
BIMI relies on DMARC. There is a 'Verified Mark Certificate' required, and this ensures that you and only you can use your logo. a Verfied Mark Certificate is a certificate of authentication that is a mark of guarantee to the recipient that the logo is owned by the sender. If your logo is a prominent one (which is why you are here on this site, and you care about showing it on all your emails), then BIMI helps you flaunt your logo, whenever you send genuine emails.
In short, BIMI relies on DMARC and VMC. We can help you get BIMI and DMARC done, because that is what we know best. Leave the technology to us, while you grow your business and your brand.
BIMI ENABLED BRANDS


STAY IN TOUCH
hello@bimidmarc.com
hello@emailauth.io
(Powered by EmailAuth -
The leaders in DMARC, SPF, DKIM and BIMI).
Tel: +44 207 993 0067
London | Dubai | San Francisco | Delhi | Mumbai | Singapore + Over 150 countries via local partners.
REQUEST DEMO
To schedule a demo of how BIMI and DMARC can help you, please fill in your contact details and we will connect with you immediately.
TECH SPEAK
Get all the tech speak here, so you can enable BIMI by yourself, or reach out to us, we are BIMI fanatics, and we'll be glad to help.

How to create a BIMI Record?
The following steps will guide you through the process of creating a BIMI record for your domain:
-
Obtain a copy of your brand logo and convert it to SVG format. The image must be a squared logo that does not contain any extra text. For a more comprehensive guide on how to create the image.
-
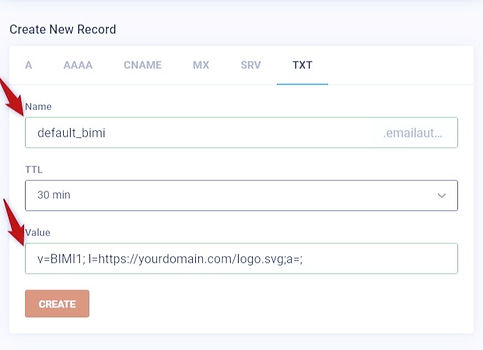
Go to the DNS hosting provider and select ‘Create Record’.
-
Add host value. You will probably enter the value _bimi and the hosting provider will append the domain/subdomain following that provided value.
-
Select the ‘TXT’ option from the dropdown list of DNS record types.
-
Add ‘Value’ information.
-
Click the ‘Save Record Set’ button to generate a new BIMI record.
-
Run a BIMI record check to verify the record you just created has the correct values and syntax.
BIMI Implementation: Step by step.
STEP 1: Implement DMARC in enforcement mode on the domain
BIMI can be used by organizations that have a DMARC enforcement policy in place, i.e DMARC policy needs to be in 'p=quarantine' or' p=reject' mode. Check your DMARC record by going to: www.emailauth.io
If your DMARC record contains p=quarantine or p=reject then you can proceed to the next step. If not, contact us on hello@emailauth.io and our awesome team can help with this.
STEP 2: Set up the BIMI record on your DNS.
A BIMI record is a DNS entry that specifies the location of your brand logo and the validation location of your logo.
STEP 3: Choose the logo that will be visible to subscribers in their inboxes
SVG images are supported by BIMI. The image must be a square logo that does not contain any extra text. The URL should be provided in the DNS TXT record, and the logo should be stored in HTTPS.
STEP 4: Get a Verified Mark Certificate (VMC)
Verified Mark Certificates (VMC) can be obtained by getting in touch with us at hello@emailauth.io or calling us on +44 207 993 0067.
...and You're done!
It is a good idea to keep track of the outcomes of the BIMI installation. Click-through and/or open rates can be monitored too :-)
BIMI Logo requirements
-
The logo should be square so that proper fitting is ensured
-
It must be in SVG Tiny Portable/Secure format
-
It must have a solid background so that brand guidelines are not impacted by different display environments
-
The BIMI logo must be published on a domain with a SSL Certificate (via HTTPS)
-
The logo must be vector-based
-
The SVG file should be compact and cannot exceed 32KB
Steps to Create a BIMI SVG Logo
-
Open your vector-based file in Adobe Illustrator.
-
Click ‘File > Save As’, following which the ‘Save As’ dialog box appears.
-
In the ‘Save As’ dialog box, provide the name for your file. From the ‘Format’ dropdown, select ‘SVG (svg)’, and then click ‘Save’. This will bring up another dialog box.
-
In the dialog box, from the ‘SVG Profiles’ dropdown, select ‘SVG Tiny 1.2’, from the ‘Image Location’ dropdown, select ‘Preserve’, and click ‘OK’.
-
Open the SVG file that you just created in a code/text editor. There are a number of free tools that you can use. Here are some suggestions:
- Atom
-CodePen (no sign up necessary)
- Nano
- Sublime Text
-
In the code editor, make the following changes to the file:
6.1. If your image contains x/y attributes, remove them.
6.2. Change the base Profile from ‘tiny’ to ‘tiny-ps’.
6.3. Add a title. This must not be more than 64 characters.
6.4. Save the modified (SVG) file.
6.5. Upload the SVG file to the server for which the BIMI record is configured.
Troubleshooting the BIMI SVG Logo File
1. Check for bitmap image embedded in the SVG file
Non-vector (bitmap) elements like scripting and external linking, and referencing according to the BIMI logo specifications are incompatible with the standard and will affect logo display. This can be difficult and sometimes impossible to see with naked eyes. To find out if a bitmap image has been added, check the SVG file.
To inspect your SVG file for bitmap images, follow these steps:
-
Download your logo and inspect it by opening your image in a browser. To do this, right-click your logo > Open with > Select your browser.
-
When the image is visible, right-click your logo > View page source.
-
In the image code, search for ‘img/’. If the search returns a result it can be assumed that the SVG file contains a bitmap image and, hence, does not match the prerequisites of the BIMI logo.
Example: When the next line (file.Xlink:href=”data:img/png;base64) is found, the SVG file contains a reference to a PNG (Bitmap) making it incompatible.
Solution: Reach out to the designer of the logo to modify the file to make it a completely vector-based file.
2. Ensure that the file does not contain any unnecessary data or links
Even if the format of the file indicates that it is a ‘.svg’ file, it may still contain data or links that are not required, which could create issues. Follow the same steps mentioned above to inspect your logo for unnecessary data. If you find any, delete it by editing your file using any text editor of your choice.
Still facing issues? Connect with us on hello@emailauth.io or ping here on chat on BIMIDMARC.com and one of us will be happy to help.